
A couple weeks ago we published an article called “Caulking for Dummies”. It was inspired by own personal hunt for tips and tricks on how to caulk some areas at my house. I moved into a new house in 2023, a condo actually, and had it totally remodeled. Well, the contractor who did the work was less than stellar, and there many things that needed done, including caulk for my bathroom. That was the impetus for the article and this is part 2, where I’ll share some additional tips and tricks, and details.
12 Insider Tips for Caulking Like a Pro
- Clean the area. This is one thing that was missing from the previous article. Wipe down the area around the bathtub with a damp cloth to remove any dirt or debris.
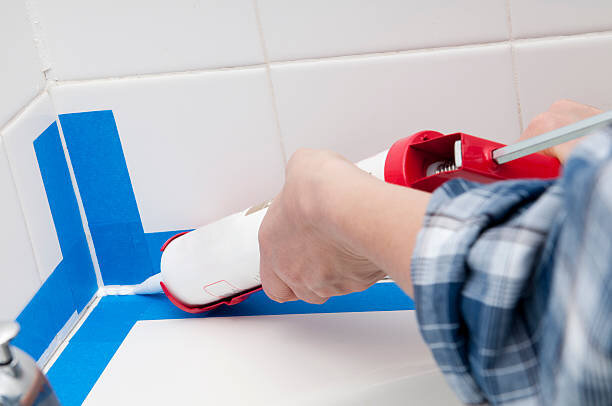
- Apply painter’s tape. This is something that was missing from my caulk job. I wish now that I’d used either painters tape or masking tape on the wall and bathtub. When you caulk, apply tape about 1 inch away from the joint. This will help to protect the surfaces from the caulk, and leave a beautiful, straight line when you’re done.
- Cut the tip of the caulk tube. Use a utility knife to cut the tip of the caulk tube at a 45-degree angle. Go toward the tip of the tube for narrower bead, go for the bottom of the tip for a larger bead. One article I read said to gauge the bead size by the joint size that you’re filling. That suggestion made sense to me! However, since the contractor left things very unlevel in my house, I’m not sure that worked out so well for me personally. I needed multiple bead sizes…LOL.
- Puncture the tip of the caulk tube after cutting open. There are caulk guns that have devices to puncture the tip on them. You can also use a long nail or coat hanger.
- Start small with cutting the tip of the caulk tube. You can always go larger if the bead size isn’t big enough.
- Squeeze the trigger a few times, ensuring the plunger is at the bottom of the caulk tube. You have to sort of “prime” it. Make sure the caulk has entered the tip of the caulk tube before you setup to begin your bead.
- Make one, long, continuous bead with the caulk gun, while moving the caulk gun steadily at a 45 degree angle through the motion.
- When the trigger reaches the handle, release it and it will reset
- Smooth the caulk. Use your finger to smooth the caulk into the joint. Be sure to create a concave shape, so that water will run off the surface.
- Consider a caulk finishing tool. I bought one of these. Personally I think my wet finger worked better.
- Remove the painter’s tape. Carefully remove the painter’s tape while the caulk is still wet. Go at a 45 degree angle, away from the surface.
- Let the caulk dry. Allow the caulk to dry completely before using the bathtub again. Most estimates indicate that waiting 24-48 hours is ideal, but every caulk has a different recommendation for curing time. I personally couldn’t wait 1-2 days to use my shower again, but water actually helps to bond the type of caulk that you use in a bathtub anyway.
Troubleshooting
Following the above steps will help alleviate one of the most common problems, which is having messy or uneven caulk lines. Here are some additional considerations if you’re having trouble with your caulk job.
- Gaps or holes in the caulk:
- Ensure that the caulk tube nozzle is cut at an angle to create a small hole for precise application.
- Apply enough pressure to the caulk gun to ensure a steady flow. If the caulk is coming out too slowly, try squeezing the trigger more firmly.
- Fill larger gaps or holes with backer rod before applying caulk.
- Caulk not adhering properly:
- Clean the surface thoroughly to remove any dirt, dust, or old caulk.
- Use a caulk formulated for the specific surface you’re working on (e.g., silicone caulk for wet areas, acrylic caulk for general use).
- Check the expiration date on the caulk tube and use fresh caulk for optimal performance.
- Caulk shrinking or cracking:
- Make sure the caulk is fully cured before exposing it to water or extreme temperature changes.
- Apply an appropriate primer before caulking, especially on porous surfaces.
- Consider using a high-quality caulk that is more resistant to shrinking and cracking.
- Excessive caulk or overfilling:
- Use a caulk finishing tool or a wet finger to smooth and remove excess caulk.
- Wipe away excess caulk immediately with a damp cloth or sponge.
- If caulk is coming out too quickly, release the trigger a bit.
3 More Things to Know Before you Start
- Consider using a handheld tube of caulk for small projects, like a bathroom vanity. I wish I would have known this when I caulked mine.
- Remove any excess caulk with a utility knife.
- Choose the right type of caulk. There are many different types of caulk available, each with its own strengths and weaknesses. Choose the type of caulk that is best suited for the area you are caulking. See our first article about caulk for details.
Problems with Caulk
- Cracks. Caulk can crack over time due to exposure to sunlight, heat, and moisture.
- Shrinkage. Caulk can shrink over time, leaving gaps where water or moisture can seep in.
- Bacteria growth. Caulk can harbor bacteria, which can cause mold and mildew growth.
- Discoloration. Caulk can discolor over time, becoming unsightly.
If you notice any of these problems with your caulk, it’s time to replace it. Caulk should be replaced every few years, or sooner if it shows signs of damage. Replace caulk regularly.
That’s it! Did you ever think you’d spend this much time reading about how to caulk your bathroom? I know I didn’t. Remember, practice makes perfect, and it’s always a good idea to test your caulking skills on a small, inconspicuous area before tackling larger projects. Watch some videos and give it a go, you’ll be a pro in no time!